
この記事ではKotlinでRecyclerViewを使ってシンプルなカレンダーを作る方法を詳しく解説します。
初心者の方でも理解しやすいように具体的な実装方法をサンプルコード付きで解説しているので、ぜひ参考にして実装してみてください。
完成イメージ
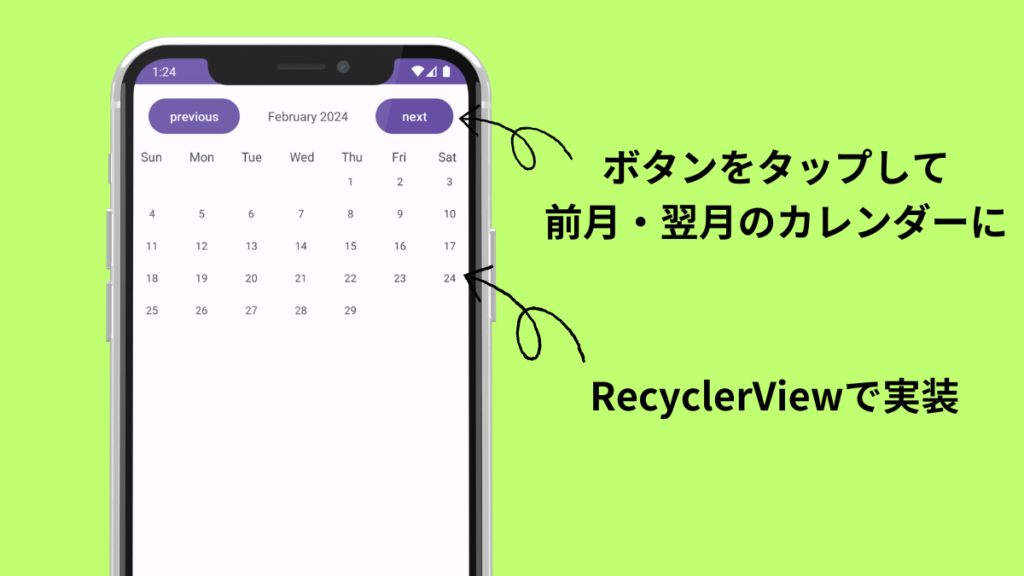
今回作るのはシンプルな機能のカレンダーです。
ボタンを押して前月・翌月のカレンダーに変えられるようにします。
実装
ここから実装方法を解説していきます。
先に全体のソースコードを確認したい方はこちらから読んでください。
レイアウト
activity_main.xml
activity_main.xmlでカレンダーのレイアウトを作成します。
ConstraintLayoutにLenearLayoutを追加してその中に、前月・翌月のカレンダーに変更するためのボタンと何月のカレンダーか表示するためのTextViewを配置しましょう。
TextViewにandroid:layout_weight=”1″とandroid:gravity=”center”を記述することで両端にボタン、中央にTextViewという配置を作れます。
<LinearLayout
    android:id="@+id/linearLayout"
    android:layout_width="match_parent"
    android:layout_height="wrap_content"
    android:paddingTop="12dp"
    app:layout_constraintEnd_toEndOf="parent"
    app:layout_constraintStart_toStartOf="parent"
    app:layout_constraintTop_toTopOf="parent">

    <Button
        android:id="@+id/previousButton"
        android:layout_width="wrap_content"
        android:layout_height="wrap_content"
        android:layout_marginStart="24dp"
        android:text="previous" />

    <TextView
        android:id="@+id/monthText"
        android:layout_width="0dp"
        android:layout_height="wrap_content"
        android:layout_weight="1"
        android:gravity="center"
        android:text="Dec 2023" />

    <Button
        android:id="@+id/nextButton"
        android:layout_width="wrap_content"
        android:layout_height="wrap_content"
        android:layout_marginEnd="24dp"
        android:text="next" />

</LinearLayout>
先ほど追加したLinearLayoutの下に、さらにLinearLayoutを追加して曜日を表示するためのTextViewを配置しましょう。
TextViewのpaddingは位置を調整するために記述しています。文字のサイズなどに応じて調整してください。
<LinearLayout
    android:id="@+id/linearLayout2"
    android:layout_width="match_parent"
    android:layout_height="wrap_content"
    android:layout_marginTop="12dp"
    app:layout_constraintTop_toBottomOf="@+id/linearLayout">

    <TextView
        android:layout_width="wrap_content"
        android:layout_height="wrap_content"
        android:layout_weight="1"
        android:gravity="center"
        android:text="Sun" />

    <TextView
        android:layout_width="wrap_content"
        android:layout_height="wrap_content"
        android:layout_weight="1"
        android:gravity="center"
        android:text="Mon" />

    <TextView
        android:layout_width="wrap_content"
        android:layout_height="wrap_content"
        android:layout_weight="1"
        android:gravity="center"
        android:text="Tue" />

    <TextView
        android:layout_width="wrap_content"
        android:layout_height="wrap_content"
        android:layout_weight="1"
        android:gravity="center"
        android:text="Wed" />

    <TextView
        android:layout_width="wrap_content"
        android:layout_height="wrap_content"
        android:layout_weight="1"
        android:gravity="center"
        android:paddingEnd="2dp"
        android:text="Thu" />

    <TextView
        android:layout_width="wrap_content"
        android:layout_height="wrap_content"
        android:layout_weight="1"
        android:gravity="center"
        android:paddingEnd="6dp"
        android:text="Fri" />

    <TextView
        android:layout_width="wrap_content"
        android:layout_height="wrap_content"
        android:layout_weight="1"
        android:gravity="center"
        android:paddingEnd="5dp"
        android:text="Sat" />

</LinearLayout>
LinearLayoutの下にRecyclerViewを配置します。
<androidx.recyclerview.widget.RecyclerView
    android:id="@+id/rv"
    android:layout_width="match_parent"
    android:layout_height="wrap_content"
    app:layout_constraintTop_toBottomOf="@+id/linearLayout2"
    tools:layout_editor_absoluteX="0dp" />
one_layout.xml
layoutにone_layout.xmlを作成しましょう。
one_layoutではカレンダーに表示する日付1つ分のレイアウトを作ります。
<?xml version="1.0" encoding="utf-8"?>
<androidx.constraintlayout.widget.ConstraintLayout xmlns:android="http://schemas.android.com/apk/res/android"
    xmlns:app="http://schemas.android.com/apk/res-auto"
    android:layout_width="match_parent"
    android:layout_height="wrap_content"
    android:id="@+id/day_layout">

    <TextView
        android:id="@+id/day_text"
        android:layout_width="wrap_content"
        android:layout_height="wrap_content"
        android:text="1"
        android:layout_marginTop="10dp"
        android:textSize="12sp"
        android:layout_marginBottom="10dp"
        app:layout_constraintBottom_toBottomOf="parent"
        app:layout_constraintEnd_toEndOf="parent"
        app:layout_constraintStart_toStartOf="parent"
        app:layout_constraintTop_toTopOf="parent" />

</androidx.constraintlayout.widget.ConstraintLayout>
カレンダーを実装
ここからカレンダーを実装していきます。
RecyclerViewの実装方法についての詳しい解説はこちらの記事で書いています。
基本的なRecyclerViewの実装方法を知りたい方はこちらも併せてお読みください。

ViewHolderItem
ViewHolderItemという名前のファイルを追加します。
ViewHolderItemではRecyclerViewに日付1つ分を表示するための設定をしています。
import android.view.View
import android.widget.TextView
import androidx.recyclerview.widget.RecyclerView

class ViewHolderItem(v:View): RecyclerView.ViewHolder(v){
    var oneDayText:TextView = v.findViewById(R.id.day_text)
}
RecyclerviewAdapter
RecyclerviewAdapterという名前のファイルを追加しましょう。
RecyclerviewAdapterではファイル名の通りRecyclerViewのAdapterを定義します。
class RecyclerviewAdapter(daysInMonth: ArrayList<Long>) : RecyclerView.Adapter<ViewHolderItem>(){
    …
}
コンストラクタのdaysOfMonthはRecyclerViewに表示する日付をリスト化したものです。後ほどMainActivity内で作成します。
RecyclerviewAdapter内に以下のコードを追加しましょう。
private var daysOfMonth = daysInMonthonCreateViewHolder内でセルのレイアウト(one_layout.xml)の読み込みとViewHolderItemとの紐づけをします。
override fun onCreateViewHolder(parent: ViewGroup, viewType: Int): ViewHolderItem {
    val oneXml = LayoutInflater.from(parent.context).inflate(R.layout.one_layout,parent,false)
    return ViewHolderItem(oneXml)
}
onBindViewHolderで日付をセルに表示するようにします。
override fun onBindViewHolder(holder: ViewHolderItem, position: Int) {
    if (daysOfMonth[position] == 0L){
        holder.oneDayText.text = ""
    }else{
        holder.oneDayText.text = daysOfMonth[position].toString()
    }
}
getItemCountではdaysOfMonthの要素の数をカウントします。
override fun getItemCount(): Int {
    return daysOfMonth.size
}
MainActivity
MainActivityではRecyclerViewのレイアウト指定やセルを表示するための設定、ボタンが押された時の挙動を指定などをします。
まずはMainActivity内に以下のlateinitを使ったvarを追加しましょう。
private lateinit var calendarRecyclerView:RecyclerView
private lateinit var monthYearText:TextView
private lateinit var selectedDate:LocalDate
initWidgetsという名前の関数を作成します。ここでは先ほど追加したvarにRecyclerViewとカレンダーの年月を表示するTextViewを代入しています。
private fun initWidgets() {
    calendarRecyclerView = findViewById(R.id.rv)
    monthYearText = findViewById(R.id.monthText)
}
onCreate内に以下のコードを追加しましょう。上2行では前月・翌月のカレンダーにするためのボタンを定義、下2行でcalendarRecyclerView・monthYearTextの定義とselectedDateへの現在の年月日の代入をしています。
val nextButton:Button = findViewById(R.id.nextButton)
val previousButton:Button = findViewById(R.id.previousButton)

initWidgets()
selectedDate = LocalDate.now()
新たに関数setMonthViewを追加しましょう。setMonthViewはRecyclerViewのレイアウトの指定などをしているRecyclerViewにセルを表示するための関数です。
前月・翌月のカレンダーに変更するボタンを押したときにもこの関数が呼び出されます。
private fun setMonthView() {
    monthYearText.text = monthYear(selectedDate)
    val daysInMonth = daysInMonthArray(selectedDate)
    val calendarAdapter = RecyclerviewAdapter(daysInMonth)
    val layoutManager: LayoutManager = GridLayoutManager(applicationContext, 7)
    calendarRecyclerView.layoutManager = layoutManager
    calendarRecyclerView.adapter = calendarAdapter
}
関数daysInMonthArrayを追加します。ここではselectedDateから日付を取得してリスト化しています。ここでできたリストdaysInMonthArrayをRecyclerViewに表示します。
private fun daysInMonthArray(date: LocalDate?): ArrayList<Long> {
    val daysInMonthArray = ArrayList<Long>()
    val yearMonth = YearMonth.from(date)
    val daysInMonth = yearMonth.lengthOfMonth()
    val firstOfMonth = selectedDate.withDayOfMonth(1)
    val dayOfWeek = firstOfMonth.dayOfWeek.value
    for (i in 1..42) {
        if (i <= dayOfWeek || i > daysInMonth + dayOfWeek) {
            daysInMonthArray.add(0)
        } else {
            daysInMonthArray.add((i - dayOfWeek).toLong())
        }
    }
    return daysInMonthArray
}monthYearという名前の関数を追加します。この関数ではmonthYearTextに表示する年月を設定しています。DateTimeFormatter.ofPattern(“MMMM yyyy”)を記述することで、年月は「February 2024」のような表記になります。
private fun monthYear(date: LocalDate?): String {
    val formatter = DateTimeFormatter.ofPattern("MMMM yyyy")
    return date!!.format(formatter)
}
onCreate内に以下のコードを追加しましょう。ここでは前月のカレンダーにするボタン(previousButton)と翌月のカレンダーに変更するボタン(nextButton)が押された時の動きを設定します。
previousButton.setOnClickListener {
    initWidgets()
    selectedDate = selectedDate.minusMonths(1)
    setMonthView()
}

nextButton.setOnClickListener {
    initWidgets()
    selectedDate = selectedDate.plusMonths(1)
    setMonthView()
}
これでRecyclerViewで作るカレンダーの完成です。
サンプルコード
package com.example.sample

import android.view.LayoutInflater
import android.view.ViewGroup
import androidx.recyclerview.widget.RecyclerView

class RecyclerviewAdapter(daysInMonth: ArrayList<Long>) : RecyclerView.Adapter<ViewHolderItem>(){

    private var daysOfMonth = daysInMonth

    override fun onCreateViewHolder(parent: ViewGroup, viewType: Int): ViewHolderItem {
        val oneXml = LayoutInflater.from(parent.context).inflate(R.layout.one_layout,parent,false)
        return ViewHolderItem(oneXml)
    }

    override fun onBindViewHolder(holder: ViewHolderItem, position: Int) {
        if (daysOfMonth[position] == 0L){
            holder.oneDayText.text = ""
        }else{
            holder.oneDayText.text = daysOfMonth[position].toString()
        }
    }

    override fun getItemCount(): Int {
        return daysOfMonth.size
    }
}package com.example.sample
import android.view.View
import android.widget.TextView
import androidx.recyclerview.widget.RecyclerView
class ViewHolderItem(v:View): RecyclerView.ViewHolder(v){
var oneDayText:TextView = v.findViewById(R.id.day_text)
}package com.example.sample
import androidx.appcompat.app.AppCompatActivity
import android.os.Bundle
import android.widget.Button
import android.widget.TextView
import androidx.recyclerview.widget.GridLayoutManager
import androidx.recyclerview.widget.RecyclerView
import androidx.recyclerview.widget.RecyclerView.LayoutManager
import java.time.LocalDate
import java.time.YearMonth
import java.time.format.DateTimeFormatter
class MainActivity : AppCompatActivity() {
private lateinit var calendarRecyclerView:RecyclerView
private lateinit var monthYearText:TextView
private lateinit var selectedDate:LocalDate
override fun onCreate(savedInstanceState: Bundle?) {
super.onCreate(savedInstanceState)
setContentView(R.layout.activity_main)
val nextButton:Button = findViewById(R.id.nextButton)
val previousButton:Button = findViewById(R.id.previousButton)
initWidgets()
selectedDate = LocalDate.now()
setMonthView()
previousButton.setOnClickListener {
initWidgets()
selectedDate = selectedDate.minusMonths(1)
setMonthView()
}
nextButton.setOnClickListener {
initWidgets()
selectedDate = selectedDate.plusMonths(1)
setMonthView()
}
}
private fun initWidgets() {
calendarRecyclerView = findViewById(R.id.rv)
monthYearText = findViewById(R.id.monthText)
}
private fun setMonthView() {
monthYearText.text = monthYear(selectedDate)
val daysInMonth = daysInMonthArray(selectedDate)
val calendarAdapter = RecyclerviewAdapter(daysInMonth)
val layoutManager: LayoutManager = GridLayoutManager(applicationContext, 7)
calendarRecyclerView.layoutManager = layoutManager
calendarRecyclerView.adapter = calendarAdapter
}
private fun daysInMonthArray(date: LocalDate?): ArrayList<Long> {
val daysInMonthArray = ArrayList<Long>()
val yearMonth = YearMonth.from(date)
val daysInMonth = yearMonth.lengthOfMonth()
val firstOfMonth = selectedDate.withDayOfMonth(1)
val dayOfWeek = firstOfMonth.dayOfWeek.value
for (i in 1..42) {
if (i <= dayOfWeek || i > daysInMonth + dayOfWeek) {
daysInMonthArray.add(0)
} else {
daysInMonthArray.add((i - dayOfWeek).toLong())
}
}
return daysInMonthArray
}
private fun monthYear(date: LocalDate?): String {
val formatter = DateTimeFormatter.ofPattern("MMMM yyyy")
return date!!.format(formatter)
}
}<?xml version="1.0" encoding="utf-8"?>
<androidx.constraintlayout.widget.ConstraintLayout xmlns:android="http://schemas.android.com/apk/res/android"
xmlns:app="http://schemas.android.com/apk/res-auto"
xmlns:tools="http://schemas.android.com/tools"
android:layout_width="match_parent"
android:layout_height="match_parent"
tools:context=".MainActivity">
<LinearLayout
android:id="@+id/linearLayout"
android:layout_width="match_parent"
android:layout_height="wrap_content"
android:paddingTop="12dp"
app:layout_constraintEnd_toEndOf="parent"
app:layout_constraintStart_toStartOf="parent"
app:layout_constraintTop_toTopOf="parent">
<Button
android:id="@+id/previousButton"
android:layout_width="wrap_content"
android:layout_height="wrap_content"
android:layout_marginStart="24dp"
android:text="previous" />
<TextView
android:id="@+id/monthText"
android:layout_width="0dp"
android:layout_height="wrap_content"
android:layout_weight="1"
android:gravity="center"
android:text="Dec 2023" />
<Button
android:id="@+id/nextButton"
android:layout_width="wrap_content"
android:layout_height="wrap_content"
android:layout_marginEnd="24dp"
android:text="next" />
</LinearLayout>
<LinearLayout
android:id="@+id/linearLayout2"
android:layout_width="match_parent"
android:layout_height="wrap_content"
android:layout_marginTop="12dp"
app:layout_constraintTop_toBottomOf="@+id/linearLayout">
<TextView
android:layout_width="wrap_content"
android:layout_height="wrap_content"
android:layout_weight="1"
android:gravity="center"
android:text="Sun" />
<TextView
android:layout_width="wrap_content"
android:layout_height="wrap_content"
android:layout_weight="1"
android:gravity="center"
android:text="Mon" />
<TextView
android:layout_width="wrap_content"
android:layout_height="wrap_content"
android:layout_weight="1"
android:gravity="center"
android:text="Tue" />
<TextView
android:layout_width="wrap_content"
android:layout_height="wrap_content"
android:layout_weight="1"
android:gravity="center"
android:text="Wed" />
<TextView
android:layout_width="wrap_content"
android:layout_height="wrap_content"
android:layout_weight="1"
android:gravity="center"
android:paddingEnd="2dp"
android:text="Thu" />
<TextView
android:layout_width="wrap_content"
android:layout_height="wrap_content"
android:layout_weight="1"
android:gravity="center"
android:paddingEnd="6dp"
android:text="Fri" />
<TextView
android:layout_width="wrap_content"
android:layout_height="wrap_content"
android:layout_weight="1"
android:gravity="center"
android:paddingEnd="5dp"
android:text="Sat" />
</LinearLayout>
<androidx.recyclerview.widget.RecyclerView
android:id="@+id/rv"
android:layout_width="match_parent"
android:layout_height="wrap_content"
app:layout_constraintTop_toBottomOf="@+id/linearLayout2"
tools:layout_editor_absoluteX="0dp" />
</androidx.constraintlayout.widget.ConstraintLayout><?xml version="1.0" encoding="utf-8"?>
<androidx.constraintlayout.widget.ConstraintLayout xmlns:android="http://schemas.android.com/apk/res/android"
xmlns:app="http://schemas.android.com/apk/res-auto"
android:layout_width="match_parent"
android:layout_height="wrap_content"
android:id="@+id/day_layout">
<TextView
android:id="@+id/day_text"
android:layout_width="wrap_content"
android:layout_height="wrap_content"
android:text="1"
android:layout_marginTop="10dp"
android:textSize="12sp"
android:layout_marginBottom="10dp"
app:layout_constraintBottom_toBottomOf="parent"
app:layout_constraintEnd_toEndOf="parent"
app:layout_constraintStart_toStartOf="parent"
app:layout_constraintTop_toTopOf="parent" />
</androidx.constraintlayout.widget.ConstraintLayout>まとめ
RecyclerViewを使ってカレンダーを作る方法を解説しました。いかがだったでしょうか。
RecyclerViewはリスト表示だけでなくカレンダーを作るなど色々な用途に活用できます。是非この記事を参考に実装してみてください。
以下の記事では「RecyclerViewの画面遷移の実装方法」について解説しています。こちらの記事もぜひ併せて読んでみてください。


コメント