この記事ではAndroidで端末のギャラリーからの画像取得の方法を解説します。
Kotlinのサンプルコード付きで説明しているので是非参考にしてみてください。
完成イメージ
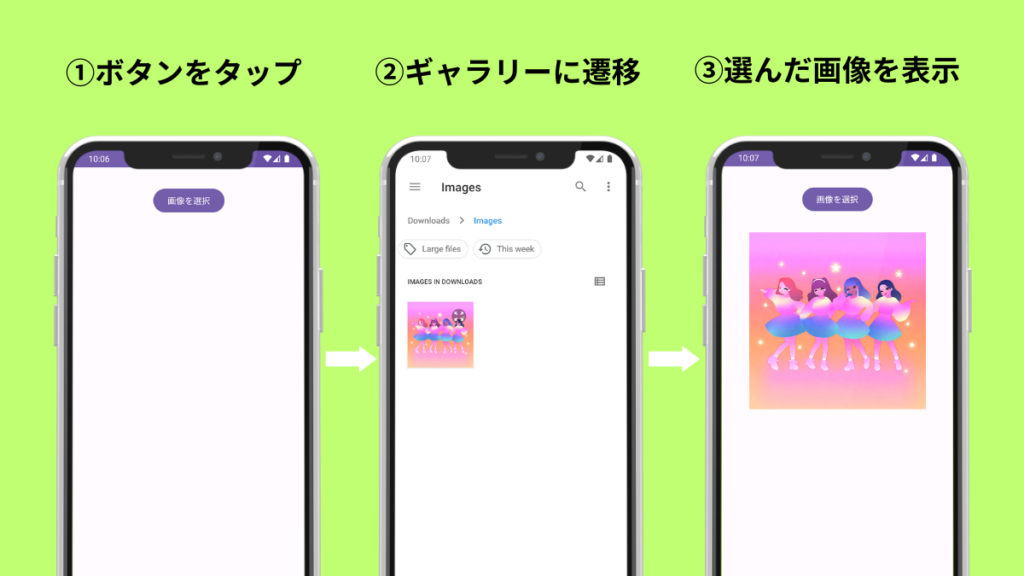
今回は、上の画像のようにギャラリーで選択した画像を画面に表示するようにします。
ボタンを押して端末内のギャラリーに遷移、ギャラリーで選択した画像がボタンの下に表示されるようなレイアウトになっています。
実装
ここから実装方法を解説していきます。
先にサンプルコードを確認したい方はこちらからお読みください。
activity_main.xml
レイアウトにはButtonとImageViewを配置しましょう。
ImageViewにはギャラリーから取得した画像を表示します。
<Button
    android:id="@+id/selectButton"
    android:layout_width="wrap_content"
    android:layout_height="wrap_content"
    app:layout_constraintEnd_toEndOf="parent"
    app:layout_constraintStart_toStartOf="parent"
    app:layout_constraintTop_toTopOf="parent"
    android:layout_marginTop="32dp"
    android:text="画像を選択"/>


<ImageView
    android:id="@+id/myImage"
    android:layout_width="300dp"
    android:layout_height="300dp"
    app:layout_constraintEnd_toEndOf="parent"
    app:layout_constraintStart_toStartOf="parent"
    app:layout_constraintTop_toBottomOf="@+id/selectButton"
    android:layout_marginTop="32dp"/>
MainActivity
まずはギャラリーに遷移するボタンを定義しましょう。
そして、このボタンが押された時の動きをsetOnClickListenerに記述していきます。
val selectButton:Button = findViewById(R.id.selectButton)

selectButton.setOnClickListener {
    val intent = Intent(Intent.ACTION_OPEN_DOCUMENT).apply {
        addCategory(Intent.CATEGORY_OPENABLE)
        type = "image/*"
    }
    selectPicture.launch(intent)
}Intent.ACTION_OPEN_DOCUMENTでドキュメントやファイルを開くIntentを作成します。
addCategory(Intent.CATEGORY_OPENABLE)ではカテゴリーを開くことができるファイルと指定します。
type = “image/*”で画像を取得できるように取得形式を指定しています。
selectPicture.launch(intent)でギャラリーから画像を取得して表示する処理を実行します。
private val selectPicture =
    registerForActivityResult(ActivityResultContracts.StartActivityForResult()){
        if (it.resultCode == Activity.RESULT_OK){
            val imageView:ImageView = findViewById(R.id.myImage)
            imageView.setImageURI(it.data?.data)
        }else{
            Toast.makeText(this, "エラーが発生しました", Toast.LENGTH_LONG).show()
        }
    }
selectPictureを作成します。selectPictureの役割はギャラリーで選択した画像をImageViewに表示することです。
registerForActivityResultはActivity.RESULT_OKまたはActivity.RESULT_CANCELを返します。
Activity.RESULT_OKが返された時は処理が成功したときなので、ギャラリーから取得した画像をImageViewにセットします。
それ以外が返された時は処理が失敗していて画像が表示できないので、「エラーが発生しました」というToastを表示することでエラーになったことを知らせるようにしています。
サンプルコード
こちらが全体のサンプルコードです。
import android.os.Bundle
import android.widget.Button
import android.widget.ImageView
import android.widget.Toast
import androidx.activity.result.contract.ActivityResultContracts

class MainActivity : AppCompatActivity() {

    override fun onCreate(savedInstanceState: Bundle?) {
        super.onCreate(savedInstanceState)
        setContentView(R.layout.activity_main)


        val selectButton:Button = findViewById(R.id.selectButton)

        selectButton.setOnClickListener {
            val intent = Intent(Intent.ACTION_OPEN_DOCUMENT).apply {
                addCategory(Intent.CATEGORY_OPENABLE)
                type = "image/*"
            }
            selectPicture.launch(intent)
        }

    }

    private val selectPicture =
        registerForActivityResult(ActivityResultContracts.StartActivityForResult()){
        if (it.resultCode == Activity.RESULT_OK){
            val imageView:ImageView = findViewById(R.id.myImage)
            imageView.setImageURI(it.data?.data)
        }else{
            Toast.makeText(this, "エラーが発生しました", Toast.LENGTH_LONG).show()
        }
    }

}<?xml version="1.0" encoding="utf-8"?>
<androidx.constraintlayout.widget.ConstraintLayout xmlns:android="http://schemas.android.com/apk/res/android"
xmlns:app="http://schemas.android.com/apk/res-auto"
xmlns:tools="http://schemas.android.com/tools"
android:layout_width="match_parent"
android:layout_height="match_parent"
tools:context=".MainActivity">
<Button
android:id="@+id/selectButton"
android:layout_width="wrap_content"
android:layout_height="wrap_content"
app:layout_constraintEnd_toEndOf="parent"
app:layout_constraintStart_toStartOf="parent"
app:layout_constraintTop_toTopOf="parent"
android:layout_marginTop="32dp"
android:text="画像を選択"/>
<ImageView
android:id="@+id/myImage"
android:layout_width="300dp"
android:layout_height="300dp"
app:layout_constraintEnd_toEndOf="parent"
app:layout_constraintStart_toStartOf="parent"
app:layout_constraintTop_toBottomOf="@+id/selectButton"
android:layout_marginTop="32dp"/>
</androidx.constraintlayout.widget.ConstraintLayout>まとめ
今回はKotlinでギャラリーから画像を取得する方法を解説しました。いかがだったでしょうか。
ギャラリーからの画像取得を実装することは難しそうに思えますが、意外と簡単に実装できます。是非この記事を参考にして実装してみてください。
参考:
ストレージ アクセス フレームワークを使用してファイルを開く | Android Developers
アクティビティの結果を取得する | Android Developers
Intent | Android Developers
以下の記事では通知機能の実装方法について解説しています。こちらも併せて読んでみてください。


コメント