この記事ではAndroidアプリの通知機能の実装方法について解説します。
サンプルコード付きで説明しているので是非参考にしてみてください。
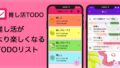
完成イメージ
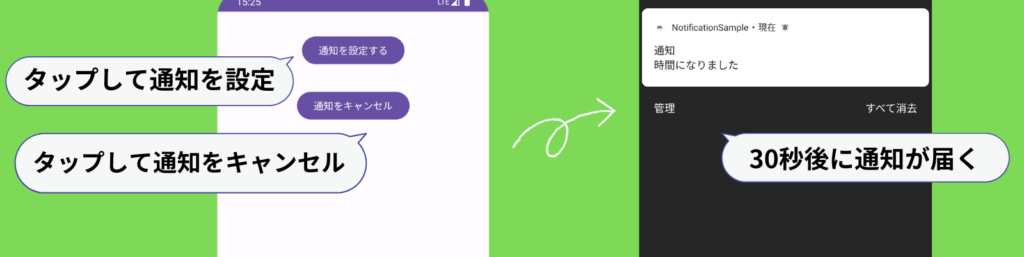
ボタンを押して通知を設定し、30秒後にプッシュ通知が届くようにします。
アプリの画面には通知を設定するボタンと通知をキャンセルするボタンを表示します。
サンプルコードと解説
ここから実装方法をサンプルコードを交えて紹介していきます。
先に全体のコードを確認したい方はこちらからご覧ください。
AndroidManifest.xml
以下のパーミッションを追加します。このコードを追加することで通知が送れるようになります。
<uses-permission android:name="android.permission.POST_NOTIFICATIONS" />applicationの中に以下のreceiverを追加します。この後説明するNotification.ktが通知を送れるようにするために必要なコードです。
<receiver
    android:name=".Notification"
    android:process=":remote" >
</receiver>
activity_main_layout.xml
レイアウトは通知を設定するボタンと通知をキャンセルするボタンだけなのでシンプルです。
<?xml version="1.0" encoding="utf-8"?>
<androidx.constraintlayout.widget.ConstraintLayout xmlns:android="http://schemas.android.com/apk/res/android"
    xmlns:app="http://schemas.android.com/apk/res-auto"
    xmlns:tools="http://schemas.android.com/tools"
    android:layout_width="match_parent"
    android:layout_height="match_parent"
    tools:context=".MainActivity">

    <Button
        android:id="@+id/set_button"
        android:layout_width="wrap_content"
        android:layout_height="wrap_content"
        android:layout_marginTop="32dp"
        app:layout_constraintEnd_toEndOf="parent"
        app:layout_constraintStart_toStartOf="parent"
        app:layout_constraintTop_toTopOf="parent"
        android:text="通知を設定する"/>

    <Button
        android:id="@+id/cancel_button"
        android:layout_width="wrap_content"
        android:layout_height="wrap_content"
        android:layout_marginTop="32dp"
        app:layout_constraintEnd_toEndOf="parent"
        app:layout_constraintStart_toStartOf="parent"
        app:layout_constraintTop_toBottomOf="@+id/set_button"
        android:text="通知をキャンセル"/>

</androidx.constraintlayout.widget.ConstraintLayout>
MainActivity
以下のコードを追加して、通知チャンネルを設定します。
Android 8.0以降では、すべての通知をチャンネルに割り当てなければいけません。
createNotificationChannel内では通知チャンネルの名前と説明、通知の重要度を指定してチャンネルを作成しています。
createNotificationChannel()private fun createNotificationChannel() {
val name = "channel"
val desc = "notification channel"
val importance = NotificationManager.IMPORTANCE_DEFAULT //通知の重要度を設定
val channel = NotificationChannel(channelId, name, importance)
channel.description = desc
val notificationManager = getSystemService(NOTIFICATION_SERVICE) as NotificationManager
notificationManager.createNotificationChannel(channel)
}以下のコードは通知を設定できるようにするためのコードです。今回は通知を設定してから30秒後に通知が届くようにしています。
private fun scheduleNotification() {
    val calendar = Calendar.getInstance() //現在の時刻を取得
    val scheduleIntent = Intent(applicationContext, Notification::class.java)
    val pendingIntent = PendingIntent.getBroadcast(
        applicationContext,
        1,
        scheduleIntent,
        PendingIntent.FLAG_IMMUTABLE or PendingIntent.FLAG_UPDATE_CURRENT
    )

    calendar.add(Calendar.SECOND, 30) //現在の時刻に30秒加算

    val alarmManager = getSystemService(Context.ALARM_SERVICE) as AlarmManager
    alarmManager.set(AlarmManager.RTC_WAKEUP,calendar.timeInMillis,pendingIntent)
}
以下のコードは通知をキャンセルするためのコードです。
private fun cancelSchedule() {
    val sIntent = Intent(applicationContext, Notification::class.java)
    val pending = PendingIntent.getBroadcast(
        applicationContext,
        1,
        sIntent,
        PendingIntent.FLAG_IMMUTABLE or PendingIntent.FLAG_UPDATE_CURRENT
    )
    val am = getSystemService(Context.ALARM_SERVICE) as AlarmManager
    am.cancel(pending)
}
Notification.kt
プロジェクトに新しくNotification.ktを追加します。
Notification.ktでは通知を送信するための処理を書いています。
BroadcastReceiverとはブロードキャストを受け取るために必要な仕組みのことです。
class Notification :BroadcastReceiver(){
    override fun onReceive(context: Context, intent: Intent) {
        …
    }
}
以下のコードはonReceive内に記述しましょう。このコードではブロードキャストを受け取った時の動き(通知の登録)を設定しています。
NotificationCompat.Builderで通知に表示するアイコンや表示する内容、通知がタップされたときにアプリを起動するなどの指定をします。
val iT = Intent(context, MainActivity::class.java).apply {
    flags = Intent.FLAG_ACTIVITY_NEW_TASK or Intent.FLAG_ACTIVITY_CLEAR_TASK
}
val pendingIntent = PendingIntent.getActivity(
    context,
    1,
    iT,
    PendingIntent.FLAG_IMMUTABLE
)

val notification: Notification = NotificationCompat.Builder(context, channelId)
    .setSmallIcon(R.drawable.ic_launcher_foreground) //通知のアイコン
    .setContentTitle("通知") //通知のタイトル
    .setContentText("時間になりました") //通知の内容
    .setContentIntent(pendingIntent) //通知をタップしたときアプリを起動
    .setAutoCancel(true) //通知がタップされたとき通知一覧から削除
    .build()

val manager = context.getSystemService(Context.NOTIFICATION_SERVICE) as NotificationManager
manager.notify(1,notification)
コード全体
AndroidManifest.xml
<?xml version="1.0" encoding="utf-8"?>
<manifest xmlns:android="http://schemas.android.com/apk/res/android"
    xmlns:tools="http://schemas.android.com/tools">

    <uses-permission android:name="android.permission.POST_NOTIFICATIONS" />

    <application
        android:allowBackup="true"
        android:dataExtractionRules="@xml/data_extraction_rules"
        android:fullBackupContent="@xml/backup_rules"
        android:icon="@mipmap/ic_launcher"
        android:label="@string/app_name"
        android:roundIcon="@mipmap/ic_launcher_round"
        android:supportsRtl="true"
        android:theme="@style/Theme.NotificationSample"
        tools:targetApi="31">
        <activity
            android:name=".MainActivity"
            android:exported="true">
            <intent-filter>
                <action android:name="android.intent.action.MAIN" />

                <category android:name="android.intent.category.LAUNCHER" />
            </intent-filter>
        </activity>
        <receiver
            android:name=".Notification"
            android:process=":remote" >
        </receiver>
    </application>

</manifest>
MainActivity.kt
package com.example.notificationsample

import android.app.AlarmManager
import android.app.NotificationChannel
import android.app.NotificationManager
import android.app.PendingIntent
import android.content.Context
import android.content.Intent
import androidx.appcompat.app.AppCompatActivity
import android.os.Bundle
import android.widget.Button
import android.widget.TextView
import android.widget.Toast
import java.util.Calendar
import java.util.Locale

class MainActivity : AppCompatActivity() {
    override fun onCreate(savedInstanceState: Bundle?) {
        super.onCreate(savedInstanceState)
        setContentView(R.layout.activity_main)

        val setButton:Button = findViewById(R.id.set_button)
        val cancelButton:Button = findViewById(R.id.cancel_button)

        createNotificationChannel()

        setButton.setOnClickListener {
            scheduleNotification()
            Toast.makeText(applicationContext, "通知を設定しました", Toast.LENGTH_SHORT).show()
        }

        cancelButton.setOnClickListener {
            cancelSchedule()
            Toast.makeText(applicationContext, "通知をキャンセルしました", Toast.LENGTH_SHORT).show()
        }
    }

    private fun scheduleNotification() {
        val calendar = Calendar.getInstance()
        val scheduleIntent = Intent(applicationContext, Notification::class.java)
        val pendingIntent = PendingIntent.getBroadcast(
            applicationContext,
            1,
            scheduleIntent,
            PendingIntent.FLAG_IMMUTABLE or PendingIntent.FLAG_UPDATE_CURRENT
        )

        calendar.add(Calendar.SECOND, 30)

        val alarmManager = getSystemService(Context.ALARM_SERVICE) as AlarmManager
        alarmManager.set(AlarmManager.RTC_WAKEUP,calendar.timeInMillis,pendingIntent)
    }

    private fun cancelSchedule() {
        val sIntent = Intent(applicationContext, Notification::class.java)
        val pending = PendingIntent.getBroadcast(
            applicationContext,
            1,
            sIntent,
            PendingIntent.FLAG_IMMUTABLE or PendingIntent.FLAG_UPDATE_CURRENT
        )
        val am = getSystemService(Context.ALARM_SERVICE) as AlarmManager
        am.cancel(pending)
    }

    private fun createNotificationChannel() {
        val name = "channel"
        val desc = "notification channel"
        val importance = NotificationManager.IMPORTANCE_DEFAULT
        val channel = NotificationChannel(channelId, name, importance)
        channel.description = desc
        val notificationManager = getSystemService(NOTIFICATION_SERVICE) as NotificationManager
        notificationManager.createNotificationChannel(channel)
    }
}
Notification.kt
package com.example.notificationsample

import android.app.Notification
import android.app.NotificationManager
import android.app.PendingIntent
import android.content.BroadcastReceiver
import android.content.Context
import android.content.Intent
import androidx.core.app.NotificationCompat

const val channelId = "channel1"

class Notification :BroadcastReceiver(){
    override fun onReceive(context: Context, intent: Intent) {
        val iT = Intent(context, MainActivity::class.java).apply {
            flags = Intent.FLAG_ACTIVITY_NEW_TASK or Intent.FLAG_ACTIVITY_CLEAR_TASK
        }
        val pendingIntent = PendingIntent.getActivity(
            context,
            1,
            iT,
            PendingIntent.FLAG_IMMUTABLE
        )

        val notification: Notification = NotificationCompat.Builder(context, channelId)
            .setSmallIcon(R.drawable.ic_launcher_foreground)
            .setContentTitle("通知")
            .setContentText("時間になりました")
            .setContentIntent(pendingIntent)
            .setAutoCancel(true)
            .build()

        val manager = context.getSystemService(Context.NOTIFICATION_SERVICE) as NotificationManager
        manager.notify(1,notification)
    }

}
activity_main_layout.xml
<?xml version="1.0" encoding="utf-8"?>
<androidx.constraintlayout.widget.ConstraintLayout xmlns:android="http://schemas.android.com/apk/res/android"
    xmlns:app="http://schemas.android.com/apk/res-auto"
    xmlns:tools="http://schemas.android.com/tools"
    android:layout_width="match_parent"
    android:layout_height="match_parent"
    tools:context=".MainActivity">

    <Button
        android:id="@+id/set_button"
        android:layout_width="wrap_content"
        android:layout_height="wrap_content"
        android:layout_marginTop="32dp"
        app:layout_constraintEnd_toEndOf="parent"
        app:layout_constraintStart_toStartOf="parent"
        app:layout_constraintTop_toTopOf="parent"
        android:text="通知を設定する"/>

    <Button
        android:id="@+id/cancel_button"
        android:layout_width="wrap_content"
        android:layout_height="wrap_content"
        android:layout_marginTop="32dp"
        app:layout_constraintEnd_toEndOf="parent"
        app:layout_constraintStart_toStartOf="parent"
        app:layout_constraintTop_toBottomOf="@+id/set_button"
        android:text="通知をキャンセル"/>

</androidx.constraintlayout.widget.ConstraintLayout>
まとめ
今回はAndroidアプリの通知機能の実装方法についてサンプルコードとともに紹介しました。いかがだったでしょうか。
コードが多くて実装が大変ですが、通知機能はとても便利なので是非この記事を参考にして実装してみてください。この記事が参考になれば幸いです。
参考:
Create a notification | Android Developers (google.cn)
通知チャンネルを作成して管理する | Android Developers
ブロードキャストの概要 | Background work | Android Developers
以下の記事ではプッシュ通知に画像を表示する方法を解説しています。
この記事で紹介した通知を実装するコードに1行コードを追加するだけで通知に画像が表示できるようになります。是非こちらの記事も併せて読んでみてください。
コメント